end
By: Team HYBB Since: Mar 2020 Licence: MIT
- 1. Setting up
- 2. Design
- 3. Implementation
- 4. Documentation
- 5. Testing
- 6. Dev Ops
- Appendix A: Product Scope
- Appendix B: User Stories
- Appendix C: Use Cases
- Appendix D: Non Functional Requirements
- Appendix E: Glossary
- Appendix F: Instructions for Manual Testing
- F.1. Launch and Shutdown
- F.2. Deleting a recipe
- F.3. Favourite a recipe
- F.4. Unfavourite a recipe
- F.5. Filtering recipes
- F.6. Undo and Redo
- F.7. Clearing the recipe list
- F.8. Adding plans
- F.9. Deleting plans
- F.10. Clearing plans
- F.11. Obtaining grocery list
- F.12. Cooking recipes
- F.13. Adding quotes
- F.14. Saving data
1. Setting up
Refer to the guide here.
2. Design
2.1. Architecture

The Architecture Diagram given above explains the high-level design of the App. Given below is a quick overview of each component.
The .puml files used to create diagrams in this document can be found in the diagrams folder.
Refer to the Using PlantUML guide to learn how to create and edit diagrams.
|
-
At app launch: Initializes the components in the correct sequence, and connects them up with each other.
-
At shut down: Shuts down the components and invokes cleanup method where necessary.
Commons represents a collection of classes used by multiple other components.
The following class plays an important role at the architecture level:
-
LogsCenter: Used by many classes to write log messages to the App’s log file.
The rest of the App consists of four components.
Each of the four components
-
Defines its API in an
interfacewith the same name as the Component. -
Exposes its functionality using a
{Component Name}Managerclass.
For example, the Logic component (see the class diagram given below) defines it’s API in the Logic.java interface and exposes its functionality using the LogicManager.java class.

How the architecture components interact with each other
The Sequence Diagram below shows how the components interact with each other for the scenario where the user issues the command delete 1.

delete 1 commandThe sections below give more details of each component.
2.2. UI component

API : Ui.java
The UI consists of a MainWindow that is made up of parts e.g.CommandBox, ResultDisplay, RecipeListPanel, StatusBarFooter etc. All these, including the MainWindow, inherit from the abstract UiPart class.
The UI component uses JavaFx UI framework. The layout of these UI parts are defined in matching .fxml files that are in the src/main/resources/view folder. For example, the layout of the MainWindow is specified in MainWindow.fxml
The UI component,
-
Executes user commands using the
Logiccomponent. -
Listens for changes to
Modeldata so that the UI can be updated with the modified data.
2.3. Logic component

API :
Logic.java
-
Logicuses theRecipeBookParserclass to parse the user command. -
This results in a
Commandobject which is executed by theLogicManager. -
The command execution can affect the
Model(e.g. adding a recipe). -
The result of the command execution is encapsulated as a
CommandResultobject which is passed git back to theUi. -
In addition, the
CommandResultobject can also instruct theUito perform certain actions, such as displaying help to the user.
Given below is the Sequence Diagram for interactions within the Logic component for the execute("delete 1") API call.

delete 1 Command
The lifeline for DeleteCommandParser should end at the destroy marker (X) but due to a limitation of PlantUML, the lifeline reaches the end of diagram.
|
2.4. Model component

API : Model.java
The diagram above has been simplified in order to provide a clearer Overview of the Model component.
The Model consists of 4 main sections: recipe, plan, record and quote.
For more details on each of the main sections of the Model, please refer to the corresponding models
illustrated in the next few sections of this document.
The Model component stores a,
-
UserPrefobject that represents the user’s preferences. -
RecipeBookobject that stores all recipes. -
PlannedBookobject that stores all plans. -
CookedRecordBookobject that stores the records of all the cooked recipes. -
QuoteBookobject that stores all quotes.
It also exposes five unmodifiable lists that can be 'observed' by the UI:
-
ObservableList<Recipe> -
ObservableList<Plan> -
ObservableList<Record> -
ObservableList<GoalCount> -
ObservableList<Quote>
TheUIcan be bound to these lists so that theUIautomatically updates when the data in the list changes.
The Model does not depend on any of the other three components.
2.4.1. Recipe Model
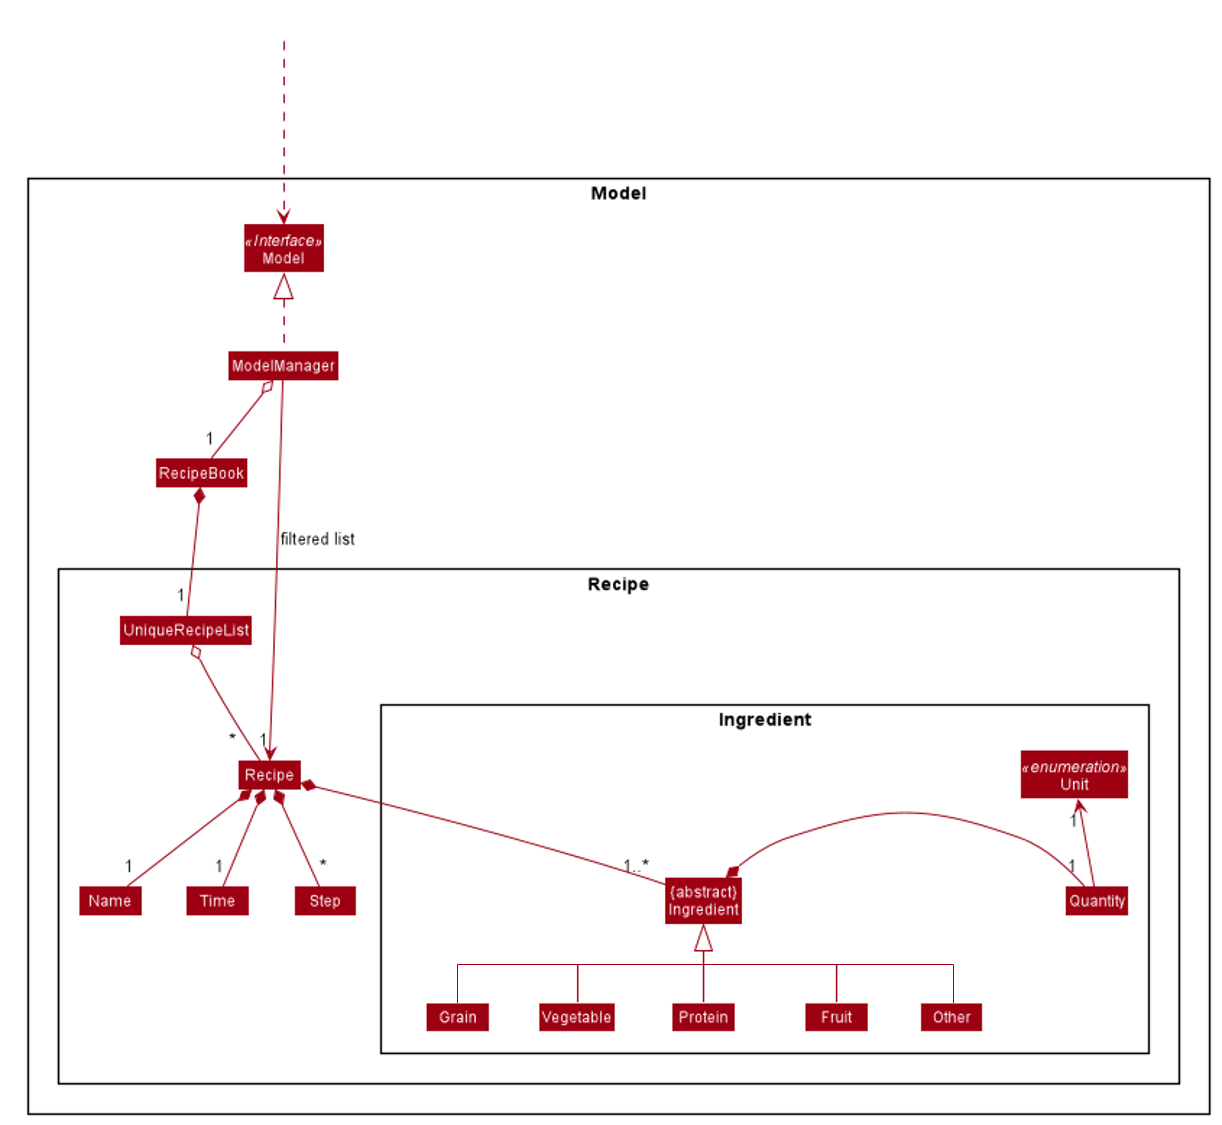
The Recipe Model stores the UniqueRecipeList containing all recipes.
Each Recipe consists of,
-
One
Name -
One
Time -
Any number of
Step -
At least one
Ingredient
For a more comprehensive description on the structure of a Recipe, please refer to The Anatomy of a Recipe in our User Guide.
2.4.2. Plan Model
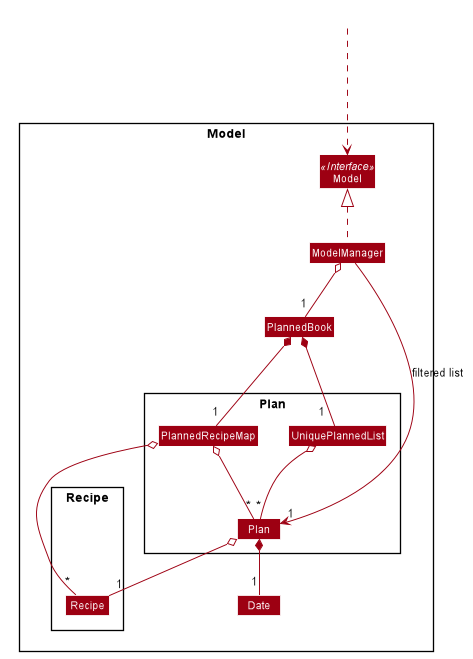
The Plan Model stores the,
-
UniquePlannedListwhich contains all plans -
PlannedRecipeMapwhich maintains the mapping fromRecipeto all the plans that uses thisRecipe
Each Plan consists of,
-
One
Date -
One
Recipe
2.4.3. Record Model
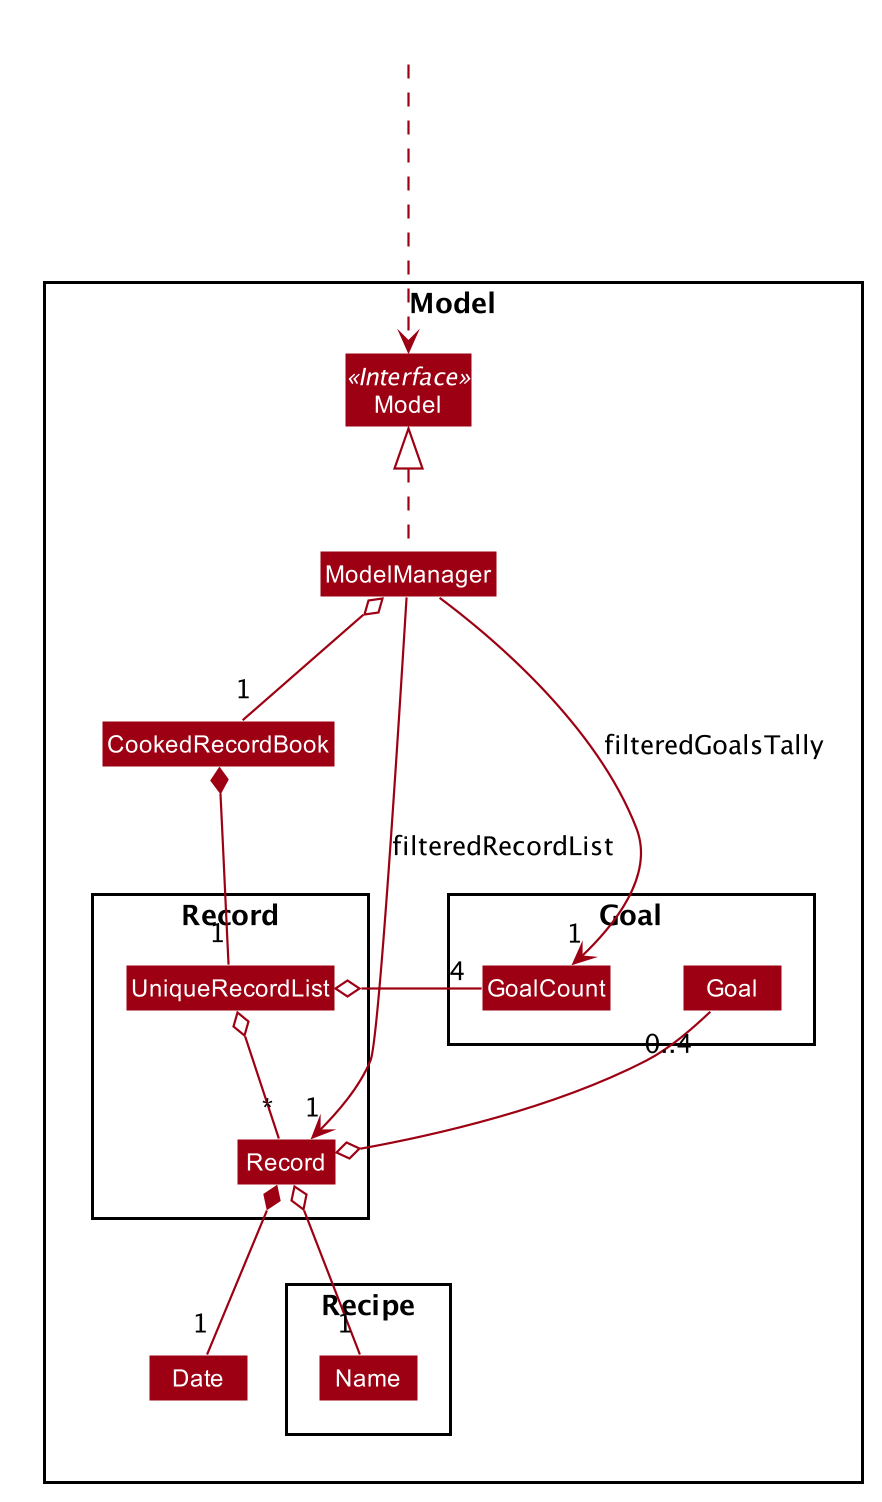
The Record Model stores the UniqueRecordList which contains all records.
Each Record consists of,
-
One
Date -
One
Namefrom aRecipe -
One set of
Goallist
2.4.4. Quote Model
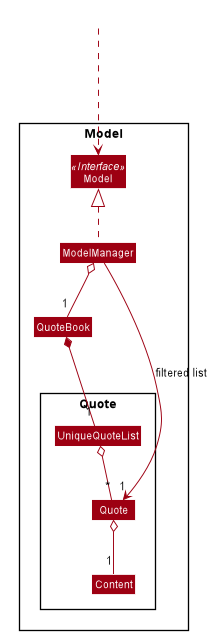
The Quote Model stores the UniqueQuoteList which contains all quotes.
Each Quote consists of one Content.
2.5. Storage component

API : Storage.java
In the figure above, we can see that we are maintaining 5 different storages. These storages aim to keep the memory of:
-
UserPrefs -
RecipeBook -
PlannedBook -
CookedRecords -
QuoteBook
The Storage component,
-
can save
UserPrefobjects in json format and read it back. -
can save the HYBB data in json format and read it back.
2.6. Common classes
Classes used by multiple components are in the seedu.recipe.commons package.
3. Implementation
This section describes some noteworthy details on how certain features are implemented.
3.1. Basic commands
3.1.1. Switch command (Harshita)
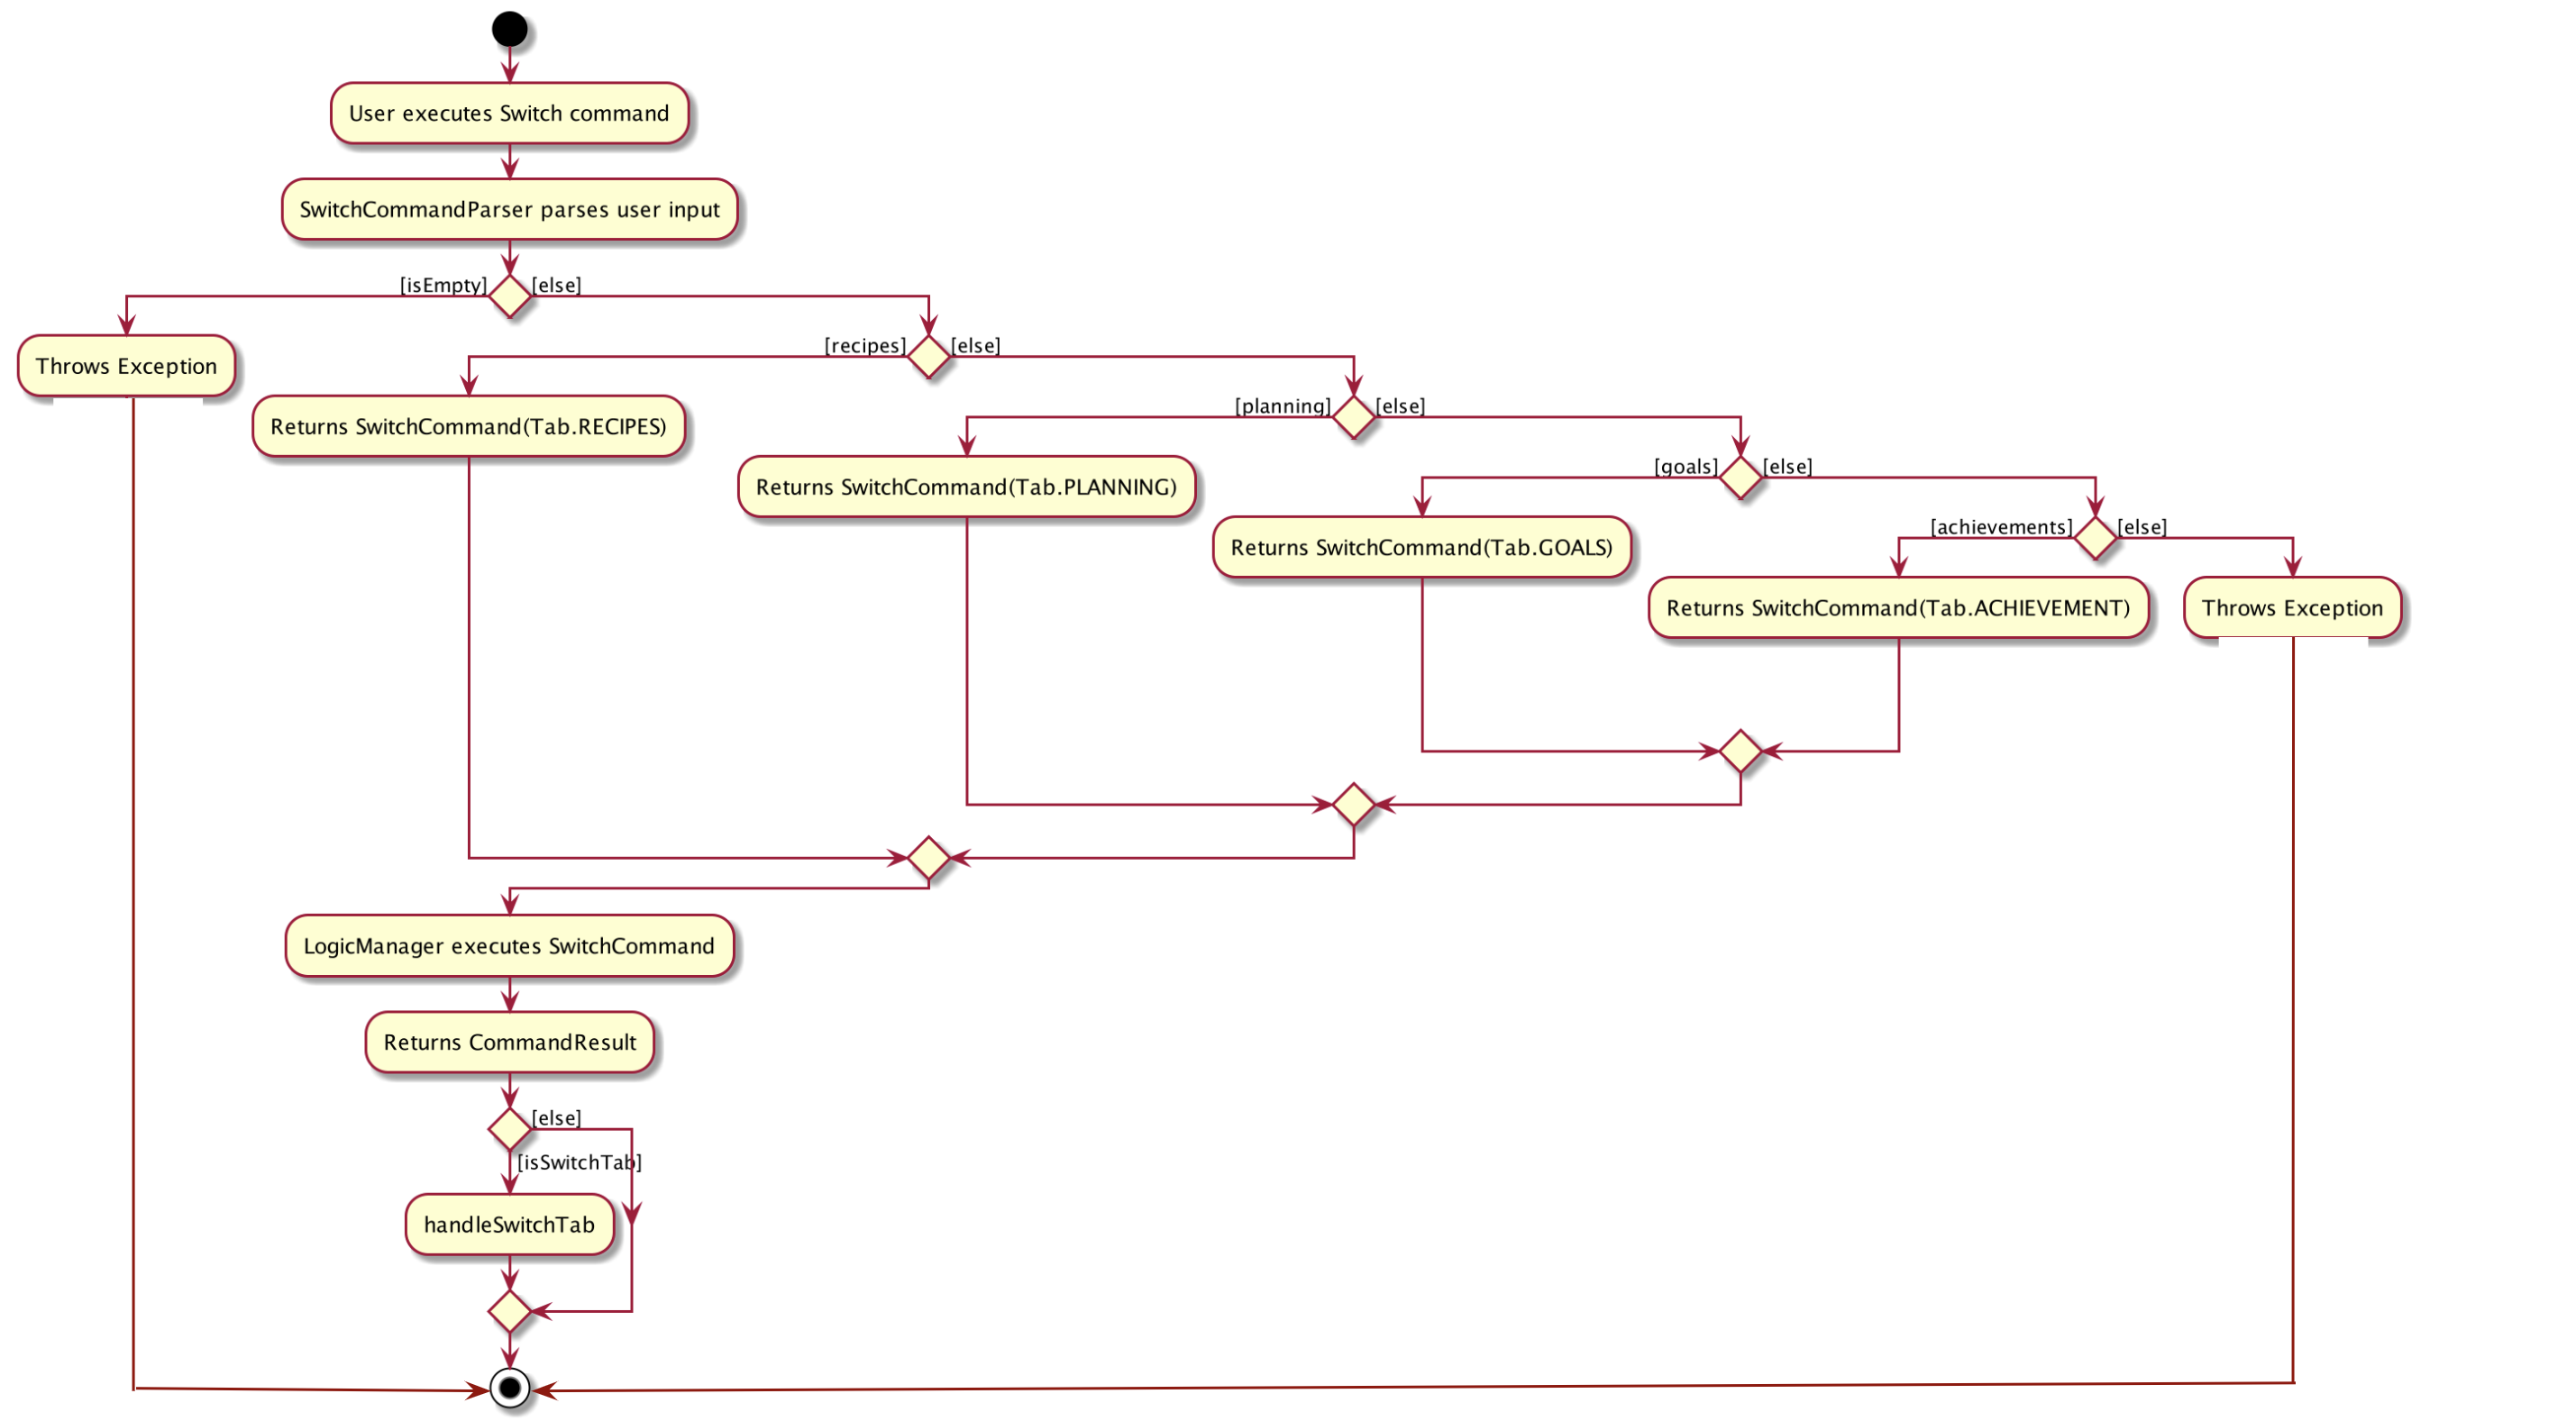
The switch command is facilitated by the MainWindow, MainTabPanel, SwitchCommandParser and SwitchCommandParser.
The following lists in sequential order the process of how switch behaves with user input.
*The user launches HYBB and the default start tab is set to the recipes tab.
*The user now executes switch planning to view the planning tab.
*LogicManager uses RecipeBookParser#parseCommand() to parse the input from the user upon execution of the switch command.
*RecipeBookParser determines which command is being used and creates SwitchCommandParser to parse the input
from the user to obtain the arguments.
*SwitchCommandParser parses the argument and checks its validity. If it is invalid,
SwitchCommandParser throws an exception and terminates. Else, it returns a SwitchCommand that contains a Tab.
-
LogicManagerusesSwitchCommand#execute()to switch to the planning tab. -
SwitchCommandreturns aCommandResultto theLogicManagerwith theTab.LogicManagerthen returns theCommandResulttoMainWindow. -
MainWindowchecks if there is a change in state forTaband if switching is needed. If there is,MainWindowusesMainWindow#handleSwitchTab()to switch tab. Else,MainWindowdoes nothing.
The following activity diagram shows the flow of activites from when the switch command is executed.
3.1.2. Edit command (Beatrice)
The edit feature allows users to edit the properties of a Recipe with ease using the edit command.
This feature is facilitated by the EditCommand class.
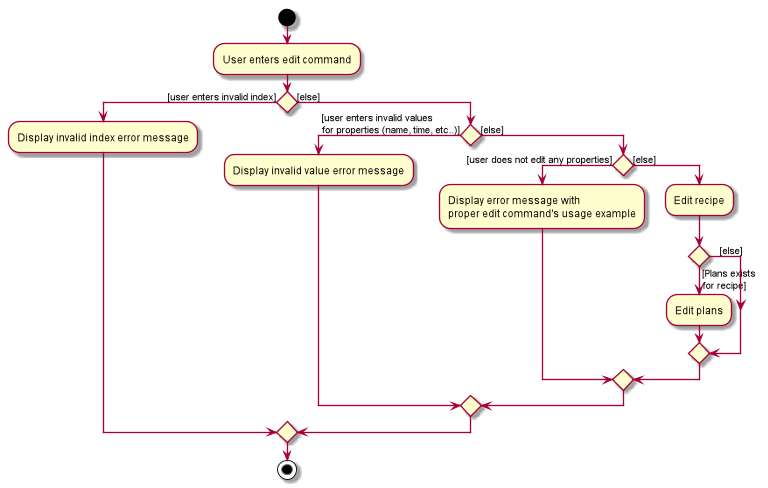
The following activity diagram illustrates how the EditCommand is used.
Implementation
This section explains how the edit command is implemented.
-
User specified arguments are passed to the
EditCommandParserand the arguments are broken up by theArgumentTokenizerandArgumentMultimap. -
The arguments will then be parsed by
ParserUtiland passed intoEditRecipeDescriptor. An error will be thrown if the inputs were invalid or if no properties of the Recipe were edited. -
A new
EditCommandobject will be created containing the new properties of theRecipe. -
EditCommand#execute()will then get the latest list of recipes fromModeland obtain theRecipethat is being edited. -
This
Recipeis passed intoEditCommand#createEditedRecipe()which creates a newRecipewith the edited properties. -
Model#setRecipe()will then replace theRecipebeing edited with the newRecipeand update the list of recipes and plans. -
The success message will be returned to the user by the
CommandResult.
The following sequence diagram summarizes the steps taken so far:
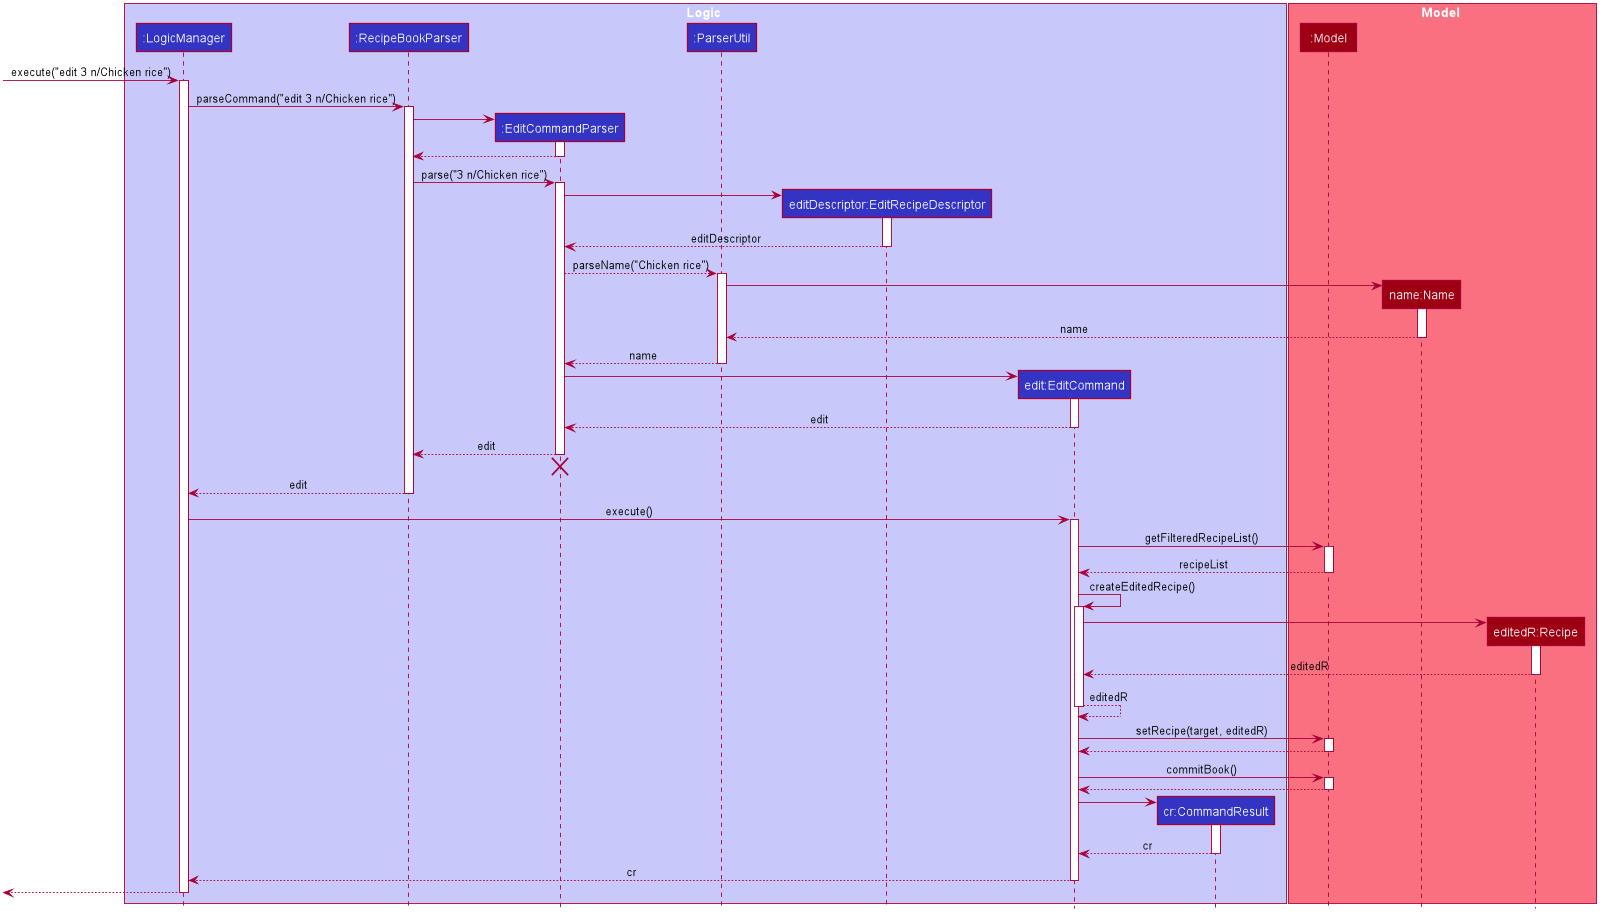
| The lifeline for EditCommandParser should end at the destroy marker (X) but due to a limitation of PlantUML, the lifeline reaches the end of diagram. |
The details of some methods, like the the usage of EditRecipeDecriptor, was omitted to reduce clutter in the diagram.
|
The edited recipe will be updated in both the list of recipes and plans.
The following section explains in detail the implementation behind how each list is updated in the
RecipeBook and PlannedBook class.
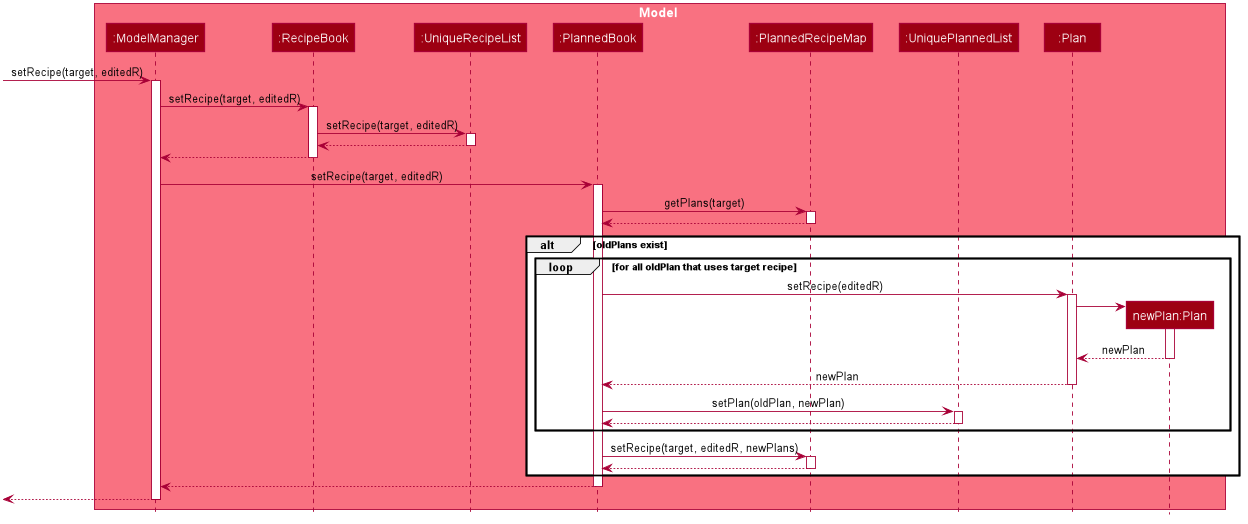
-
Continuing off from Step 8,
ModelManager#setRecipe()will be called to replace the targetRecipewith the editedRecipe. (ModelManagerimplementsModel) -
The target and edited
Recipeis passed intoRecipeBook#setRecipe()andUniqueRecipeList#setRecipe(), which will replace the target with the editedRecipein the recipe list. -
The same arguments are then passed into
PlannedBook#setRecipe()which will get a list of all the plans that uses the targetRecipefromPlannedRecipeMap. -
If there are no plans that uses
Recipe, the process stops. However if plans exists, thePlannedBookwill iterate through each old plan and update each plan.
Step 4. is an example of how the PlannedRecipeMap can be used to ease the cost of updating each plan.
The following sequence diagram summarizes how the Recipe and all its related Plan are updated
when the Recipe is edited.
Design Considerations
Aspect: How recipes are edited
-
Alternative 1 (current choice): The
EditRecipeDescriptorclass is used to make sense of user input and mimics theRecipeclass with the same properties.-
Pros: Multiple fields can be edited in one go.
-
Cons: Might make testing harder since there are many properties in a Recipe and an edit command can take on any combination of each property.
-
-
Alternative 2: Allow each property in the
Recipeto have its owneditcommand.-
Pros: Implementation of each command will be simpler.
-
Cons: Editing a recipe will be harder and more troublesome for the user.
-
We decided to stick with alternative 1, which is the implementation inherited by AB3, as we believe that being able to edit multiple fields in one go provides much more versatility and convenience to the user. Additionally, although there are many properties to test, it is still a finite number and testing can be done with adequate time.
Aspect: Data structure to support plans
Please refer to Section 3.1.2.2.2, “Aspect: Data structure to support plans” for the design considerations for plans.
3.1.3. Favourite and Unfavourite commands (Brian)
Implementation
For brevity, we will only talk about the favourite command. Note that the unfavourite command is implemented in the
same way.
-
The user input received by
FavouriteCommandParser#parsewill pass on the user input toParserUtil#parseMultipleIndexto verify if the indexes keyed in are non-zero, unsigned integers. An error is thrown if any of the indexes do not meet this requirement.On top of verifying the validity of the indexes,
ParserUtil#parseMultipleIndexwill remove any duplicate indexes and sort them. It returns a sorted array of one-based indexes. -
A new
FavouriteCommandobject will be created with the array of indexes and returned to theLogicManager. -
The
FavouriteCommand#executemethod is executed. First, the array of indexes will be checked against the currently displayed recipe list to ensure that there exists a corresponding recipe index. An error will be thrown if a user specified recipe index is out of bounds. -
Next, we check if the specified recipe(s) is already a favourite. If it is not a favourite yet, we use an
EditRecipeDescriptorto set the recipe’sisFavouriteto true. -
Finally, we display the names of the recipes that have been newly made favourites, and the names of the recipes that were already favourites.
Here is a sample sequence diagram that shows what happens when the user inputs favourite 3:
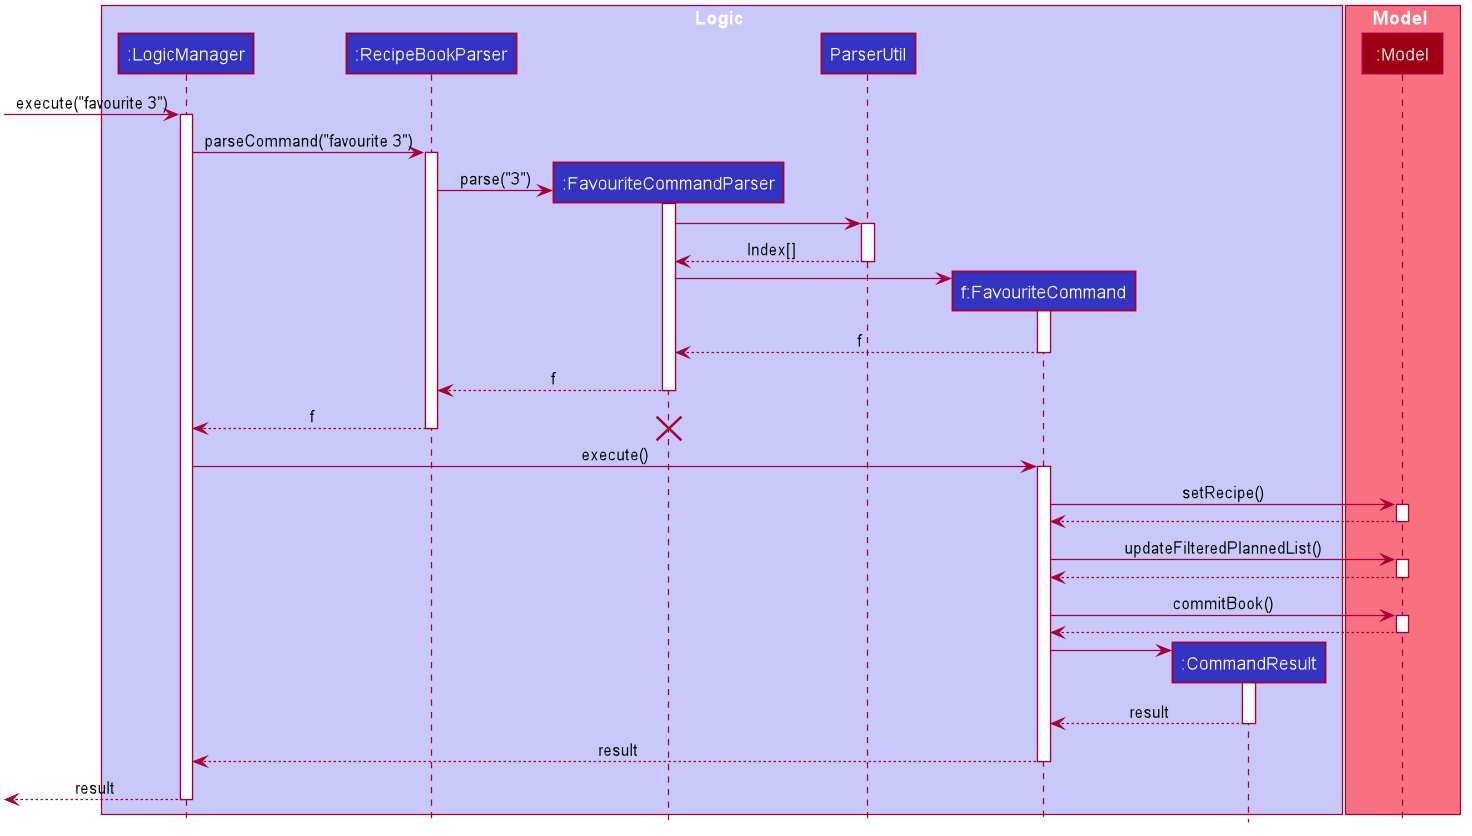
This operation favourites recipe 2 and 3.
3.1.4. Undo and Redo commands (Brian)
The implementation of undo and redo was adapted from AB3. However, HYBB requires more book-keeping because on top
of the RecipeBook, we have a PlannedBook, a CookedRecordBook, and a QuoteBook to keep track of as well.
For brevity, we will only talk about the undo command. Note that the redo command is implemented in the same way.
Implementation (before undo is called)
-
Whenever a command that changes the state of any of the books (RecipeBook, PlannedBook, CookedRecordBook, or QuoteBook) is called,
Model#commitBookis called as well. -
Model#commitBookwill first purge all redundant states inMultipleBookStateManager(ie. if the user called undo before and is now committing a new book, he will not be able to redo the actions of those undos anymore). This is the behavior that most modern desktop applications like Microsoft Word adopt. -
Model#commitBookalso saves theCommandTypeandTabof the command in 2 separate stacks inMultipleBookStateManager. Finally, it saves the new state of the affected book(s) in an ArrayList of that book type.
Note #1: CommandType tells you which book(s) the command affects, while Tab tells you which tab should be
displayed upon execution of the command.
Note #2: All 4 ArrayLists of the 4 book types have a "current pointer" each, which points to the respective states of
the books that the Model is currently using (ie. what the user is seeing).
The following diagram summarizes what happens when the user executes a command that changes the state of any book:

Implementation (when undo is called)
-
Model#canUndois called to check if there are sufficient actions to be undone. An error is thrown if there are insufficient actions to be undone. -
If able to undo,
Model#undoBookis called. TheCommandTypestack is popped to know which book(s) need undoing. At the same time, the "current pointer" of the corresponding book ArrayList(s) is/are shifted backwards. All 4 books inModelare then set to the version of the book that each "current pointer" is pointing to.
This class diagram shows the components of MultipleBookStateManager:

The following diagrams show what happens after the execution of various commands:


Design Considerations
Aspect: How undo and redo executes
One concern we had while choosing the design of the undo and redo features was the amount of memory that has to be used to keep track of the different states of the 3 books.
On top of the ArrayLists of different book types, we also needed to have 2 additional stacks to keep track of the
corresponding CommandType and Tab.
We eventually decided on the current implementation because we do not expect the user to make that many changes to the books in a single session. We also do not expect the size of any book to grow so huge that a single commit would take up all the memory capacity. In other words, we foresee that the "cons" of our current choice will not happen (it would take really abnormal user behavior for it to reach that stage).
-
Alternative 1 (current choice): Saves the entire recipe book.
-
Pros: Easy to implement.
-
Cons: May use up a lot of memory space within a single session 1) if there is a large number of book commits and/or 2) if the magnitude of a single commit is large (ie. the book being committed is huge just by itself).
-
-
Alternative 2: Individual command knows how to undo/redo by itself.
-
Pros: Will use less memory.
-
Cons: Tedious to ensure the correctness of the implementation of each individual command. Furthermore, some commands affect multiple books, making book-keeping even more complicated (and hence, susceptible to error).
-
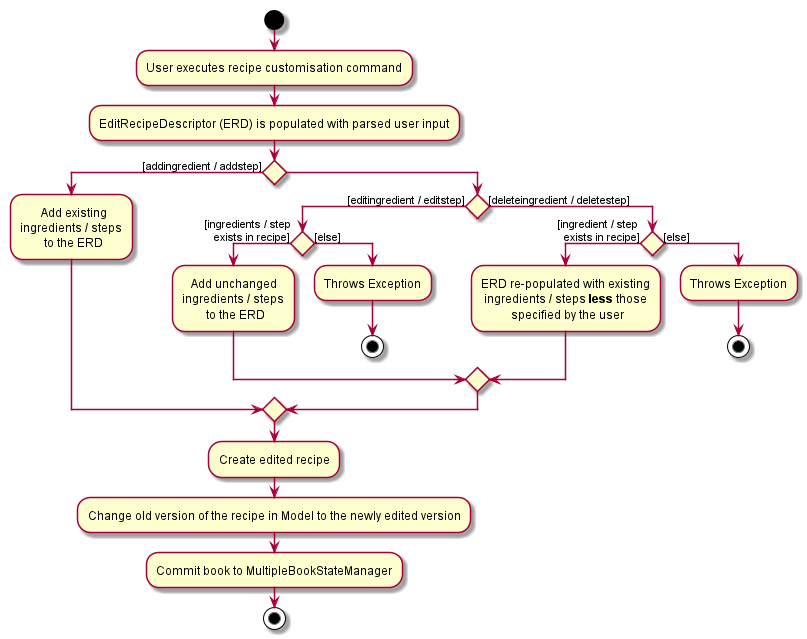
3.2. Recipe customisation commands (Brian)
The following commands: addingredient, editingredient, deleteingredient, addstep, editstep, and deletestep
were implemented to overcome the limitations of the edit command. These recipe customisation commands allow the user
to make targeted changes to the ingredient or step fields instead of having to rewrite the entire field using edit.
3.2.1. Implementation
-
The commands listed above make use of
EditRecipeDescriptor(ERD) to add, edit, or delete ingredients or steps. This is done by comparing the contents of the ERD to the contents of the field to be edited and making the necessary changes described below (note that at this point of time, the ERD is already populated with the user’s input):-
If the command is
addingredientoraddstep, the existing ingredients or steps from the recipe will be added to the ERD. -
If the command is
editingredientoreditstep, the ERD will be checked against the recipe to see if the ingredients or step exists in the recipe. If it exists, the remaining ingredients or steps that were not changed will be added to the ERD. Otherwise, an exception is thrown. -
If the command is
deleteingredientordeletestep, the ERD will be checked against the recipe to see if the ingredients or step exists in the recipe. If it exists, the ERD will be re-populated with the existing ingredients or steps from the recipe, less the ones that were specified by the user. Otherwise, an exception is thrown.
-
-
With the ERD fields set, the specified recipe is edited by
EditCommand#createEditedRecipeusing the ERD. -
Finally,
Model#setRecipewill replace the old version of the recipe in RecipeBook with the newly edited one.Model#commitBookwill commit the new state of the RecipeBook to theMultipleBookStateManagerso that the user will be able to undo this command if he wishes to.
3.3. Filter command (Brian)
The advanced filter feature uses the filter command to search for recipes according to the set of keywords provided
by the user. Think of it as a greatly enhanced and more robust version of the find command, which only allows the
user to find recipes by their name.
3.3.1. Implementation
This section explains how the filter command is implemented.
-
User specified keywords are directed to
FilterCommandParser#parsewhereArgumentTokenizerandArgumentMultimapare used to parse the user input. An exception will be thrown if no keywords are specified at all. -
The parsed user input is then fed into
RecipeMatchesKeywordPredicatewhere aPredicate, p, is created. This predicate will subsequently be used as the filter to get all recipes that meet the user specified criteria. -
A new
FilterCommandobject will be created with the predicate, p, and be returned to theLogicManager. -
The
FilterCommand#executemethod is executed andModel#updateFilteredRecipeListis called. This tests every recipe in the database against the predicate, p, and updates the filtered recipe list with recipes that meet the user specified criteria. -
Once complete, this filtered recipe list is displayed to the user.
Here is a sample sequence diagram that shows what happens when the user inputs filter favourites t/20 ig/Pasta:
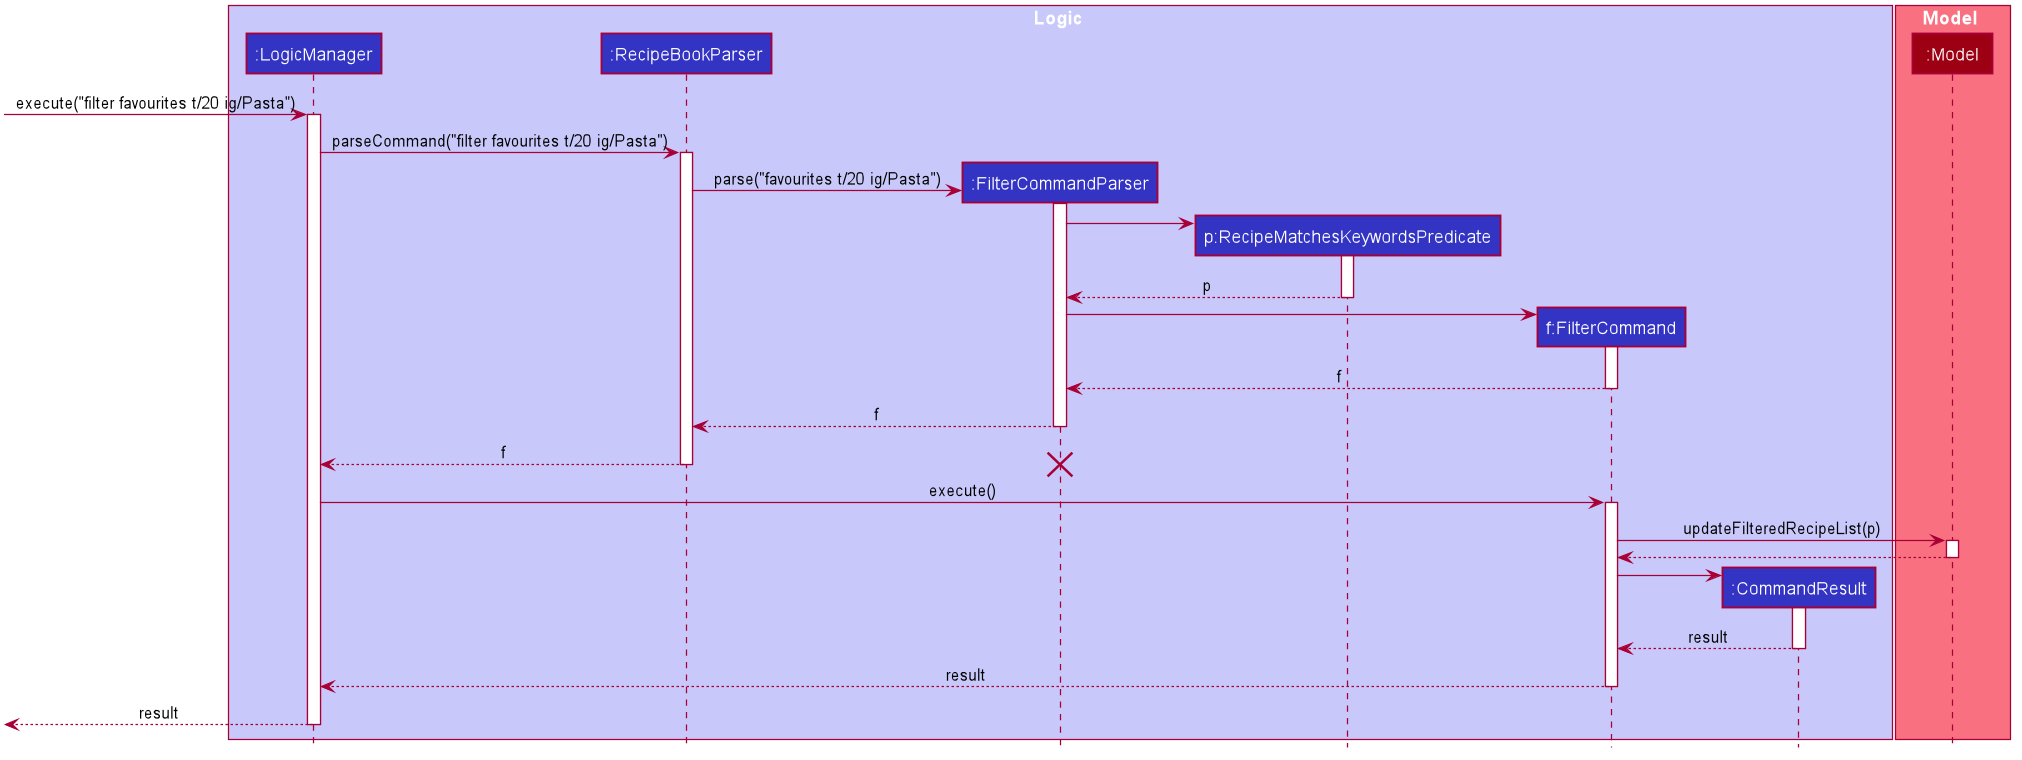
This operation displays all recipes that 1) are marked as favourites, 2) take 20 minutes or less to prepare, and 3) contains pasta as an ingredient.
3.3.2. Design Considerations
Aspect: Consistency of user input format
One concern we had while implementing this feature was the sheer number of commands and prefixes that our app had.
Eventually, the current implementation was chosen because we didn’t want to define a new format for filter
keywords which might potentially confuse our users.
-
Alternative 1 (current choice): Use the existing prefixes and format in the user input.
-
Pros: The existing
ArgumentTokenizerandArgumentMultimapclasses already have capabilities to parse user input that is in a certain format. Thus, using the same format saves us time and effort in implementing our own parser. It also spares the user from having to remember multiple formats / keywords. -
Cons: The user has to be familiar with the prefixes and other special keywords in order to use this feature to its fullest potential.
-
-
Alternative 2: Define new keywords that the user can use. These keywords could be "more english-like" as opposed to using shortened tags as prefixes.
-
Pros: Easy to remember these keywords since they are more english-like.
-
Cons: We must implement our own parser which is tedious. The user will also have to remember a new set of keywords on top of the existing prefixes. This is double work for the user.
-
3.4. Plan command (Beatrice)
The plan feature allows users to plan for recipes that they wish to cook at a certain date.
This feature is facilitated by the PlanCommand class.
3.4.1. Implementation
This section explains how the plan command is implemented.
-
User specified arguments are passed to the
PlanCommandParserwhich usesArgumentTokenizerandArgumentMultimapto break up the user input. -
The arguments are parsed by
ParserUtiland if no invalid inputs were found, aPlanCommandobject will be created. -
PlanCommand#execute()gets the latest list of recipes fromModel. -
For every
Index, a newPlanobject is created and added into theModel. This is done by passing thePlanand theRecipethat is being planned into theUniquePlannedListandPlannedRecipeMap. -
The
Planis added to theUniquePlannedListand thePlanis added to the list of plans at theRecipekey in thePlannedRecipeMap. -
The success message will be returned to the user by the
CommandResult.
The diagram below summarises the steps taken:
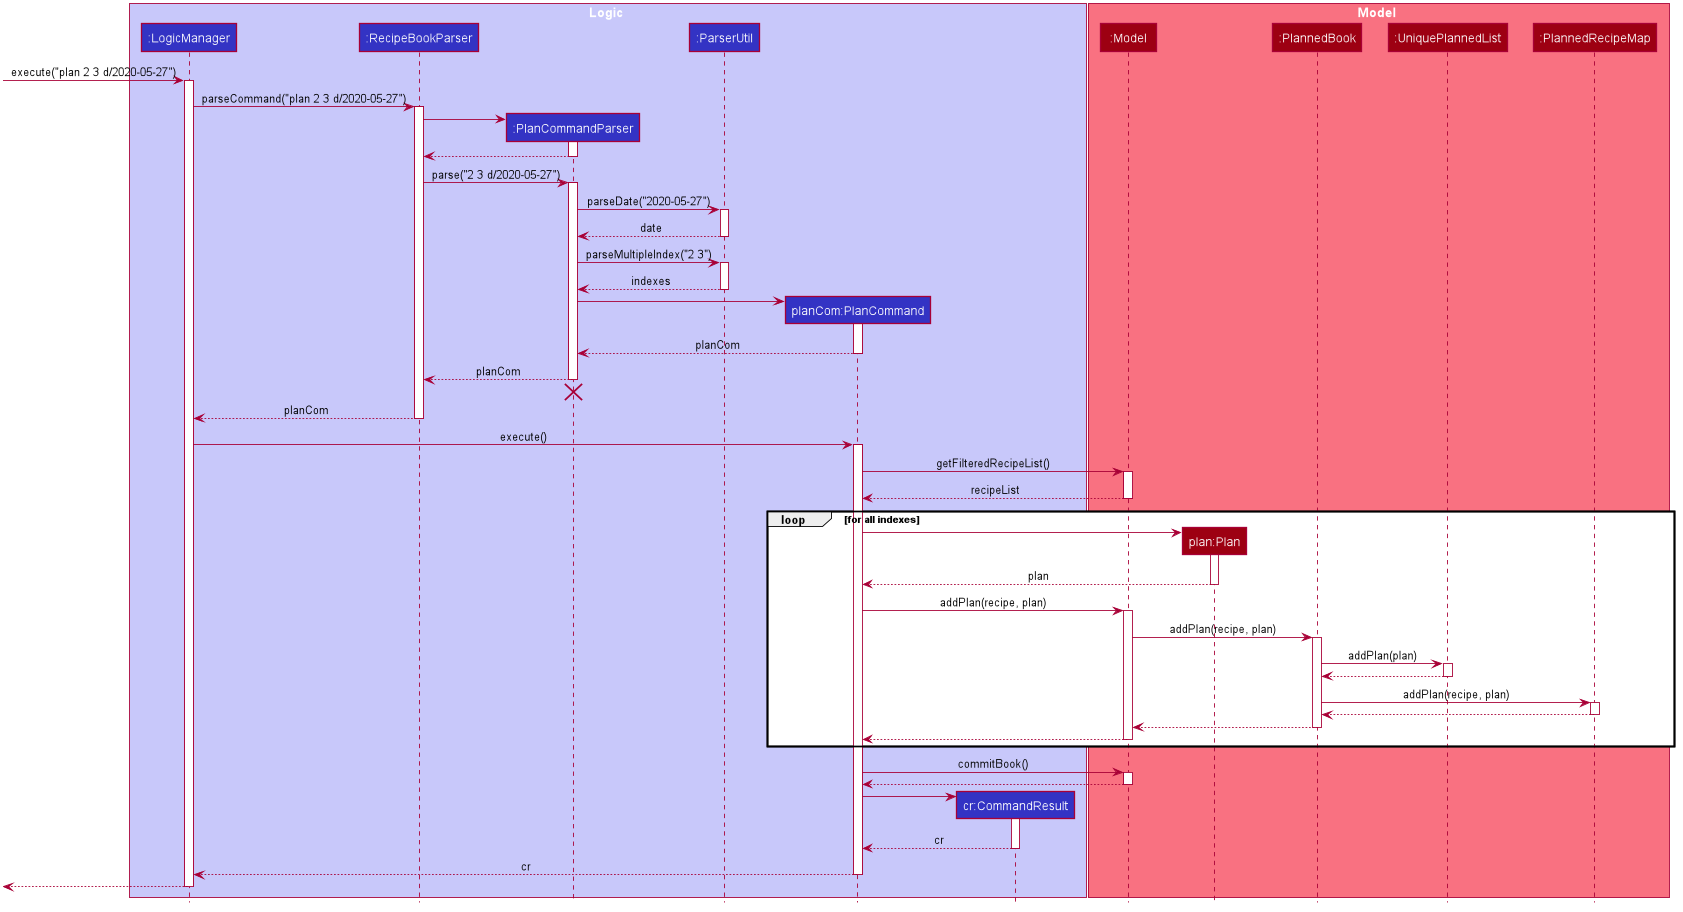
| The lifeline for EditCommandParser should end at the destroy marker (X) but due to a limitation of PlantUML, the lifeline reaches the end of diagram. |
3.4.2. Design Considerations
Aspect: Data structure to support plans
-
Alternative 1 (current choice): Use a
UniquePlannedListwith anObservableListto display the list of plans, and an internalPlannedRecipeMapthat maintains the mapping between aRecipeand all plans that were made for the recipe.-
Pros: The
UniquePlannedListprovides the list of plans and updates the UI for every change in plan. In the background, thePlannedRecipeMapis maintained and used to ease the cost of iterating through an entire list of plans to search for all the plans that uses a specificRecipe. -
Cons: Performance might not be optimised as
UniqueRecipeListstill uses a list.
-
-
Alternative 2: Maintain the recipes and plans in one
ObservableMapinstead.-
Pros: Performance will be better by using a Map than a List.
-
Cons: There are no official javafx classes that supports an sorted
ObservableMapor a filteredObservableMap. We will have to write and maintain our own implementation or import from other libraries.
-
We decided to use alternative 1, as the cons of alternative 2 are too heavy. The plans need to be sorted
in a chronological order, and future implementations of the viewWeek and viewMonth command will require the plans
to be filtered as well.
Additionally, we would not have enough time in the scope of this project to write a fully functional
implementation, and importing from other libraries introduces the risk of running into bugs if the the dependencies
were not maintained in the future.
3.5. Goals feature (Harshita)
The main functionalities and commands associated with the entire goals feature are add, addIngredient, edit, editIngredient,
cooked, listGoals and 'removeGoals'. Goals are auto-generated and added to a recipe every time add, addIngredient, edit or editIngredient is executed.
3.5.1. Details of Implementation (Auto-generation of goals)
The following sequence diagram shows how goals are generated through the example of addIngredient command execution
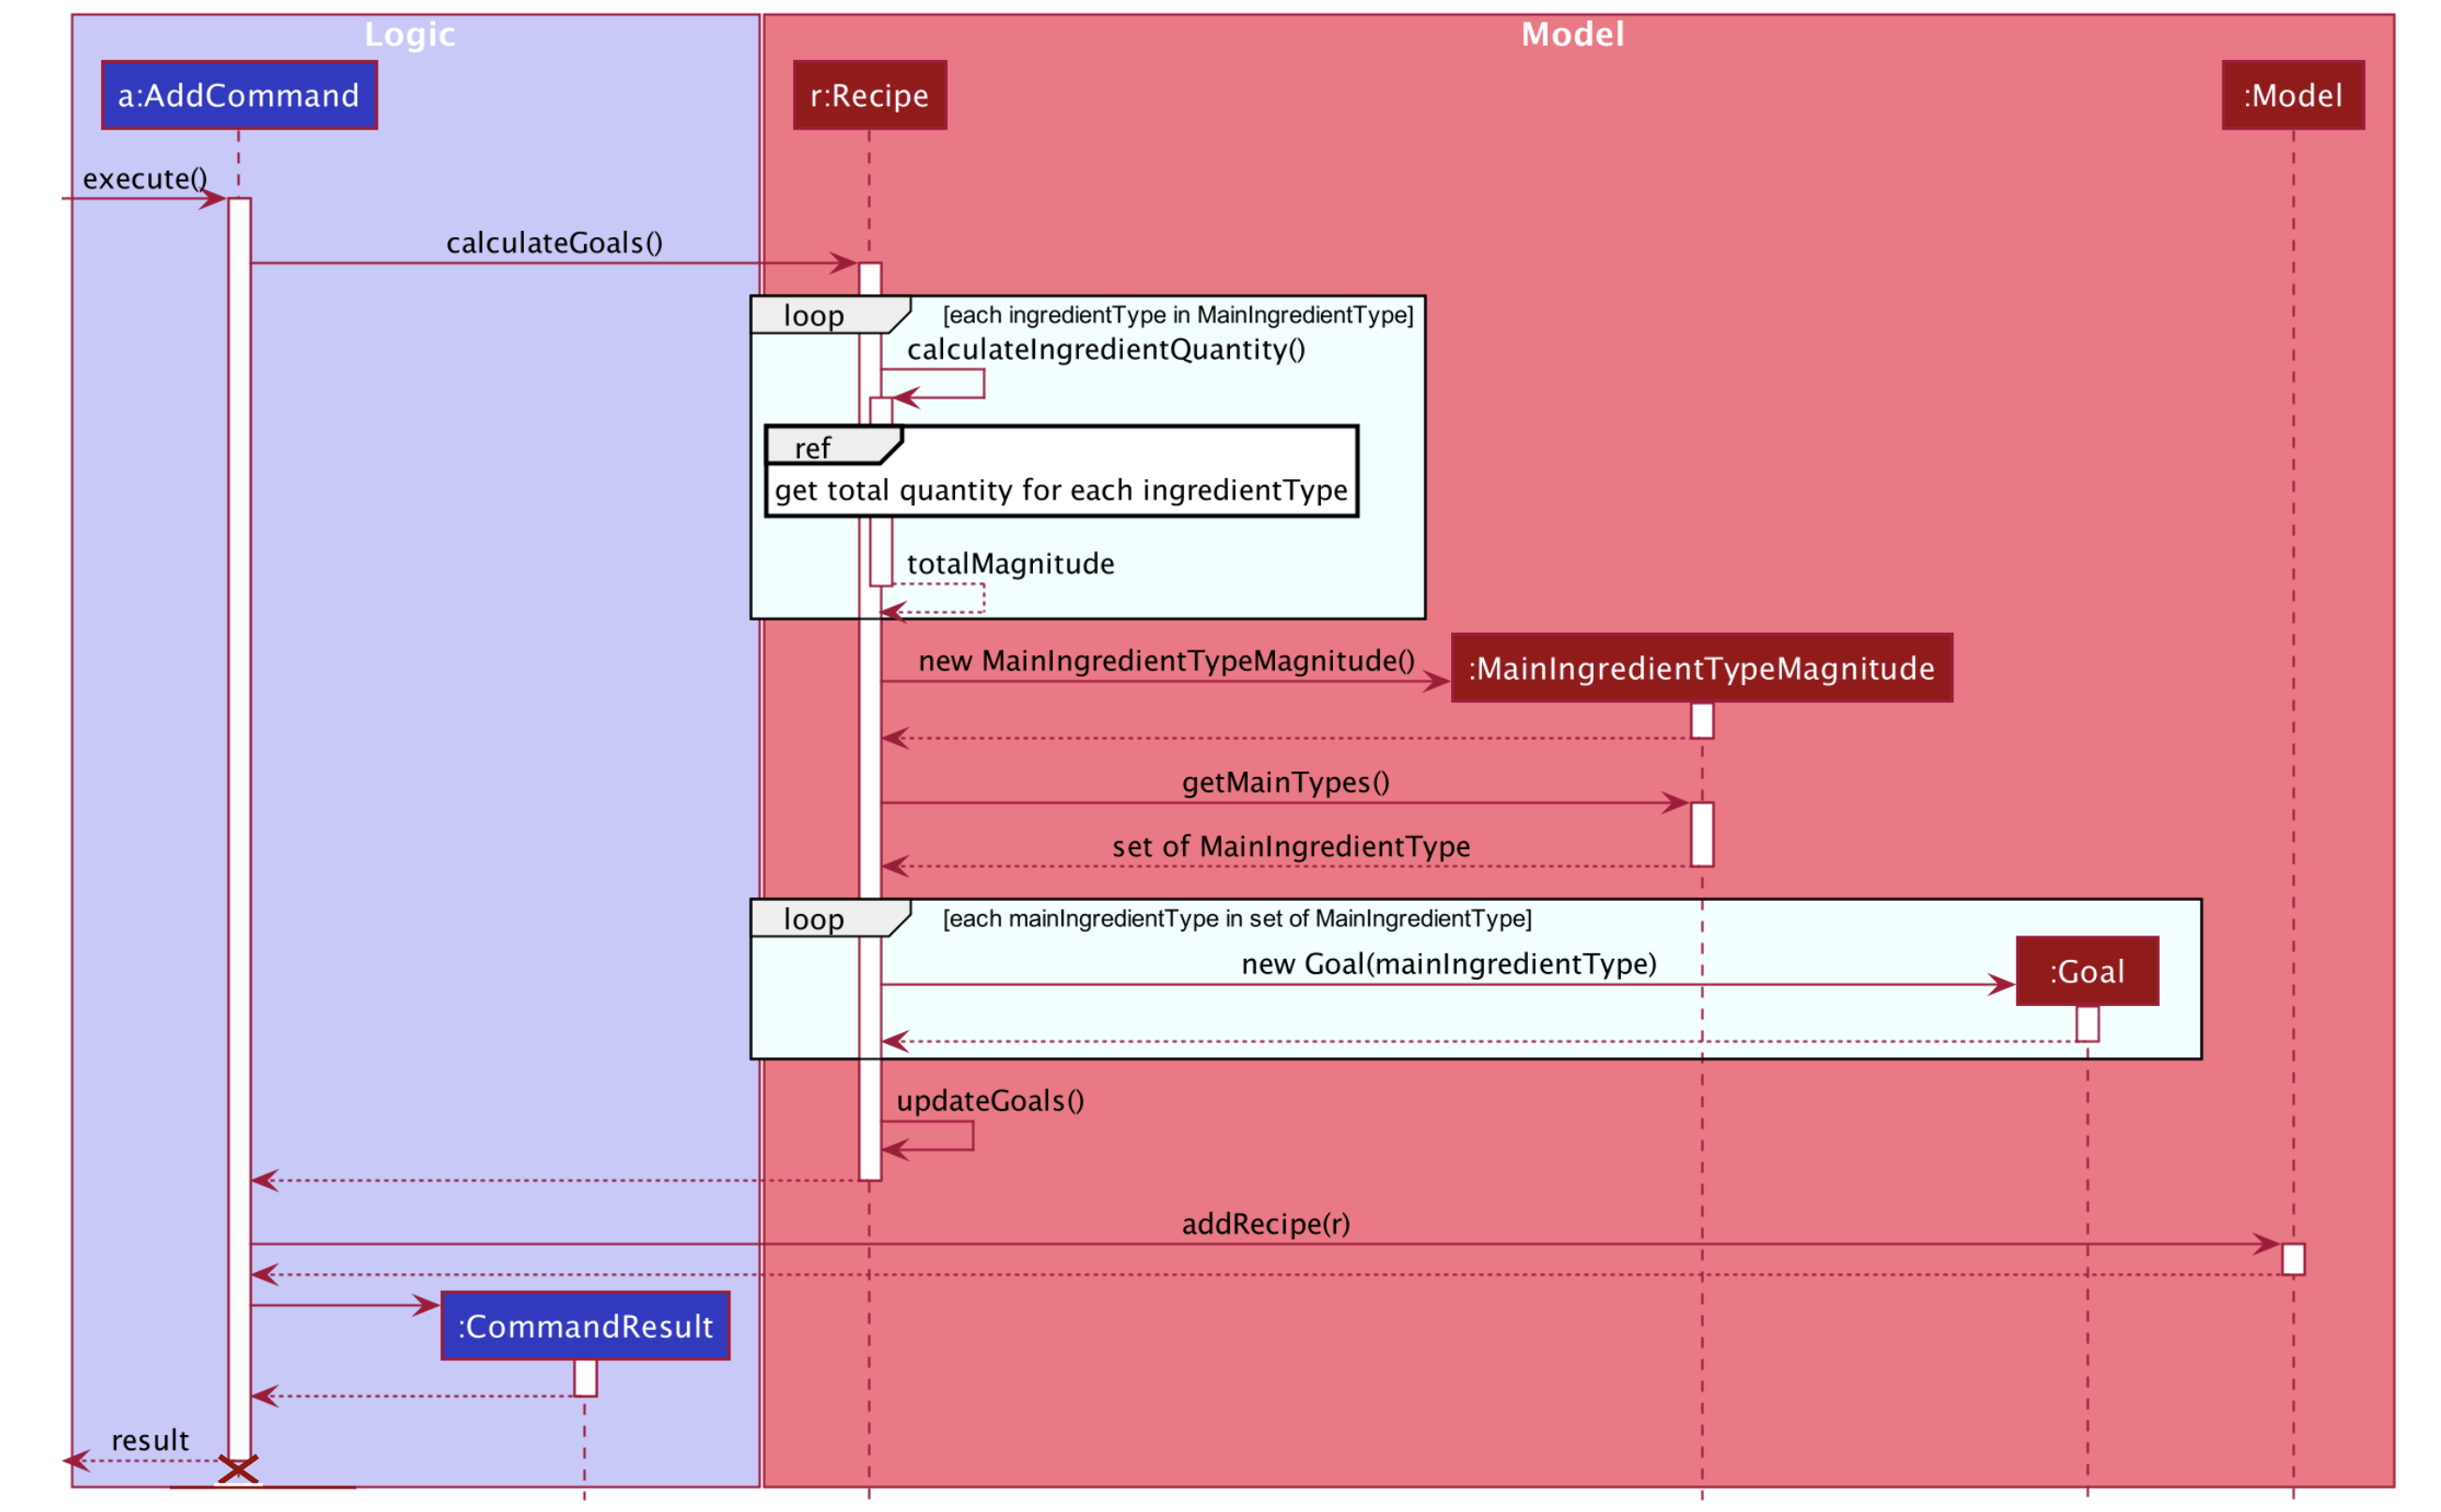

A recipe is initially created with an empty goals set from parser and calculateGoals() is then called in the AddCommand.
Each ingredient type that is associated with a goal (Vegetable, Protein, Fruit, Grain) is listed as an enum type
in MainIngredientType. This ensures that invalid goals are not created and simplifies the mapping between MainIngredientType
and Goal.
The calculation of goals then occurs through looping through each ingredient type and executing the method call to
Recipe#calculateIngredientQuantity().
This would obtain the total quantity for each ingredient, firstly by calling Ingredient#getMainIngredientType()
to ensure the validity of ingredients beings calculated (e.g. any instance of 'Other' ingredient would throw an InvalidStateException).
Secondly, by obtaining the quantity in grams through the method calls to Ingredient#getQuantity()' and 'Quantity#convertToGram().
After the calculation for each main ingredient type is completed, an instance of MainIngredientTypeMagnitude is created.
It acts as a container to store the quantities and conduct the checks for whether these quantities meet the minimum quantity
requirement for their respective food group. This calculation and checks are done through the method call to
MainIngredientTypeMagnitude#getMainTypes() which would then return a set of MainIngredientType that successfully met the
minimum requirement.
Lastly, after looping through this set and creating each goal with the mapping from MainIngredientType to Goal done
(e.g. MainIngredientType.FRUIT leads to the creation of goal with goal name generated as "Fruity Fiesta"), the goals will
be updated in the particular instance of Recipe r and Model#addRecipe(r) would then update RecipeBook in storage.
The immutability of each object is supported to ensure the correctness of undo and redo functionality.
3.5.2. Details of Implementation (Statistics of cooked recipes)
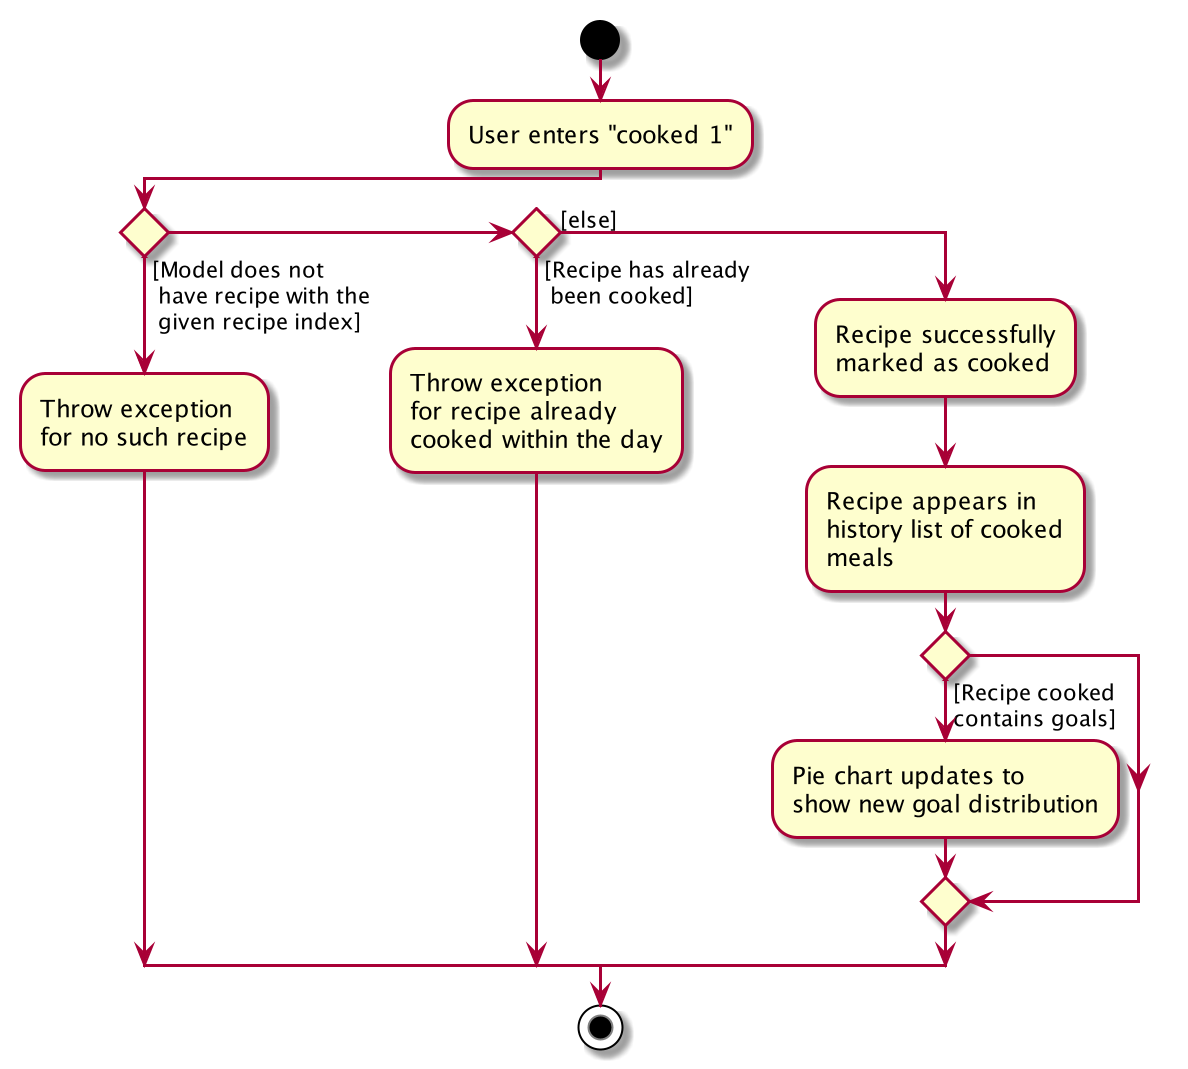
After CookedCommand#execute(model) is called, the series of checks shown in the above diagram is done to determine
if the recipe can be marked as cooked. With multiple recipes inputted (eg cooked 1 2 3, the series of checks will
loop through for for each recipe.
The checks ensure that all the recipes inputted are valid, else the CookedCommand
throws an exception and terminates. If successful, a new Record containing the Name, current Date and set of Goals
associated with the recipe is created and Model#addRecord(record) would then update CookedRecordBook in storage.
Furthermore, if the recipe marked as cooked was included in the Planned Recipes for the day, it will be removed from the planned list.
With reference to the structure of the CookedRecords Model,

We can see above that once a record is added to the UniqueRecordList two Observable lists will be updated for each
addition of Record. Firstly, it is the internalRecordsList that stores unique Record. Secondly, based on this list,
an internalGoalsTally that stores GoalCount will be updated each time. This GoalCount consists of one of the four main goal
and its respective tally and this observable list is what the pie chart will be listening to for updates and will change
each time the internalGoalsTally has been updated as well.
Hence the cooked command is essential in not only archiving data, but also giving the user personalised statistics
on their overall goal distribution that resembles the Healthy Eating Plate. The immutability of each object is
supported to ensure the correctness of undo and redo functionality as well.
3.5.3. Design Considerations
Aspect: How goals are being tagged
-
Alternative 1 (current choice): System generates tags for each recipe based on food algorithm.
-
Pros: Higher accuracy and makes use of inputs of ingredients class.
-
Cons: Would require several criteria checks that may not be intuitive and would require the use of artificial intelligence for the highest accuracy.
-
-
Alternative 2 : User chooses from 4 given goals and user adds the tags to the recipes.
-
Pros: Easy to implement. User can filter their preferred goals easily.
-
Cons: Is dependant on user’s understanding and not universal understanding of what may be deemed healthy.
-
Alternative 1 was chosen as standardising the goals give the recipes more meaning, especially when we are able
to calculate statistics and present in in an meaningful and appealing way for users when it models the Healthy eating Plate.
Furthermore, custom goals would not have checks would not have been implemented. for users to filter preferred recipes,
the command favourite as been implemented.
Aspect: How to determine the criteria for each goal
-
Alternative 1 (current choice): Check by quantity
-
Pros: More accurate and can be modelled against ideal ratio of a healthy meal.
-
Cons: Harder to implement as we need to standardise the ingredient measurements, not as intuitive.
-
-
Alternative 2 : Check by variety
-
Pros: Easy to implement.
-
Cons: Not as accurate as one grain of rice or 1 grape would still be counted as variety despite the small portion.
-
Alternative 1 was chosen because of its higher accuracy, although conversion between different measurement may be
overestimated. The command deleteGoal was then created in order to enable users to delete goals they deem inaccurate.
Aspect: How the check for goal is done
-
Alternative 1 (current choice): Check every time a recipe is added or edited and store this data
-
Pros: More consistent for the user in keeping track of their goals.
-
Cons: Harder to implement as repetitive checks are needed every time ingredients are added or modified. Will be more expensive to calculate with a larger database.
-
-
Alternative 2 : Calculate the goals for each recipe every time it is retrieved from storage and set in RecipeList.
-
Pros: Easier to implement as only one check is needed for when the recipes are set.
-
Cons: Goals will reset each time the application is open. If goal has been deleted by user with
deleteGoal, it will not be updated the next time the user opens the application as the checks will be the same.
-
Alternative 1 was chosen as it optimizes the function of deleteGoal`, taking user preference into consideration.
Aspect: How to store data for records
-
Alternative 1 (current choice): Store in a json file called records and calculate goal tally the first time it is set and update accordingly
-
Pros: A custom date can be set and it will be easier to iterate through the list to obtain goal tally.
-
Cons: Duplicate data will be stored and is harder to implement.
-
-
Alternative 2 : Use recipebook and add boolean attribute isCooked
-
Pros: Easy to implement.
-
Cons: Restricted usage, unable to implement date and do statistical analysis for the user.
-
-
Alternative 3 : Store goal tally in a new json file.
-
Pros: No need to iterate through recipe list each time and would be less expensive with a larger database.
-
Cons: Only contains four values.
-
Alternative 1 was chosen as it optimizes the functions and uses of a Record and the scale for a personal data base is smaller, storage would not be an issue. Records need to be iterated through when set initially anyway, hence the association between GoalCount and Record makes the tally process more efficient. end::goals[]
3.6. Quote Command (Yue Tong)
The quote command feature uses the quote command for users to input their own quotes to add on to the existing set of
quotes that is already in the database. This allows the users to add in customised quotes that would suit their preferance
more if the current list of quotes is not to their liking.
The following sequence diagram illustrates how the QuoteCommand is used.

| The lifeline for EditCommandParser should end at the destroy marker (X) but due to a limitation of PlantUML, the lifeline reaches the end of diagram. |
Undo button currently does not work for adding of quotes as there is no remove function currently implemented for quote
==== Implementation
|
This section explains how the quote command is implemented.
-
User specified arguments are passed to the
QuoteCommandParser#parsewhich will then parse the user input to verify if the quote field is empty. An error is thrown if the user had keyed in an empty field for quote. -
A new
QuoteCommandobject will be created with aContentfield to store the quote and returned to theLogicManager -
The
QuoteCommand#executemethod is executed andModel#addQuoteis called. This attempts to add the quote to the database and verify if any duplicate quote exists in the database viaModel#hasQuote. If a duplicate quote is detected in the database, an error will be thrown to indicate that the quote already exists in the database. -
Once the quote has been successfully updated to the database, the result window informs the user that the quote has been successfully added.
The following activity diagram further illustrates how the QuoteCommand is used.

3.6.1. Design Considerations
Aspect: How quote command executes
-
Alternative 1 (current choice): The
QuoteCommandonly accepts adding of quotes-
Pros: Maintaining the database for quotes is easier
-
Cons: Users will not be able to remove a quote if it is not to their liking and undo function does not work for quote command
-
-
Alternative 2: The
QuoteCommandaccepts both adding and removal of quotes-
Pros: Users can customize whicher quotes they want to be displayed
-
Cons: If they user deletes the quote that is on display for Quote of the Day in the Achievement tab, this could cause display problems and as
UniqueQuotesListis a hidden list, users will have to type out the quote completely similar in order to locate it
-
3.7. Streak feature(Yue Tong)
The Streak feature mainly deals with keeping track of the cooked meals that the user has logged into the system. The command
that Streak is associated with is CookedCommand as every user input of cooked will result in the streak log to be reflected when cooked is executed. The changes are reflected in two main attributes, Current streak and
High streak.
The following sequence diagram illustrates how the QuoteCommand is used.

3.7.1. Implementation
The streak feature uses data from the UniqueRecordList to parse through the recipes that the user has already cooked
and extract the dates from these recipes to determine the current streak for the user and the highest streak score the
user has attained as of yet.
The UniqueRecordList provides Streak with an observableList so that a listener could be added to it to make sure that
the streak always auto-updates whenever a new CookedRecord is added in to the database. Via the addListener, whenever
a new record is detected, the streaks are calculated again through parsing of the CookedRecords list and updated in
real time in the achievement tab.
3.7.2. Design Considerations
Aspect: How streak is stored
-
Alternative 1 (current choice): Streak is calculated and updated via access to
UniqueRecordList-
Pros: Easier to access
CookedRecordlist when there is direct access toUniqueRecordListand to update in real time -
Cons: There is more co-dependency among classes and there may be performance issues if
UniqueRecordListis too large
-
-
Alternative 2: Streak has its own database and json file to keep track of streaks
-
Pros: Lesser time is required to re-calculate streaks every time a cookedRecord is updated as streak can just be added and subtracted from its recorded data in the database
-
Cons: A database section will be dedicated to just storing one number and without access to the
UniqueRecordsListit is harder for Streak to be updated realtime when cookedRecord is updated.
-
Aspect: How streak is calculated
-
Alternative 1 (current choice): Accumulative streaks is calculated based on whether there is a 1-day difference between 2 consecutive cooked recipes
-
Pros: Easier to compute compared to implementing via a midnight deadline basis to calculate accumulative streaks
-
Cons: Streaks are not necessarily accounted for within a 24-hour period
-
-
Alternative 2: Accumulative streaks is calculated based on a stricter within 24-hour new logged cooked recipes
-
Pros: The accountability is higher for users to actually accomplish their streaks by having to cook recipes within a 24-hour period and not be able to go for more than a day without cooking new recipes without having their streaks jeopardised.
-
Cons: It is easier for users to lose their streaks and more difficult for users to ascertain when is the deadline to maintain their streaks
-
3.8. Logging
We are using java.util.logging package for logging. The LogsCenter class is used to manage the logging levels and logging destinations.
-
The logging level can be controlled using the
logLevelsetting in the configuration file (See Section 3.9, “Configuration”) -
The
Loggerfor a class can be obtained usingLogsCenter.getLogger(Class)which will log messages according to the specified logging level -
Currently log messages are output through:
Consoleand to a.logfile.
Logging Levels
-
SEVERE: Critical problem detected which may possibly cause the termination of the application -
WARNING: Can continue, but with caution -
INFO: Information showing the noteworthy actions by the App -
FINE: Details that is not usually noteworthy but may be useful in debugging e.g. print the actual list instead of just its size
3.9. Configuration
Certain properties of the application can be controlled (e.g user prefs file location, logging level) through the configuration file (default: config.json).
4. Documentation
Refer to the guide here.
5. Testing
Refer to the guide here.
6. Dev Ops
Refer to the guide here.
Appendix A: Product Scope
Target user profile:
-
university students
-
wishes to lead a healthier lifestyle
-
has trouble thinking about what to cook
-
prefer desktop apps over other types
-
can type fast
-
prefers typing over mouse input
-
is reasonably comfortable using CLI apps
Value proposition: Focuses on healthy, simple recipes with short cooking time with ingredients filter to minimise food wastage.
Appendix B: User Stories
Priorities: High (must have) - * * *, Medium (nice to have) - * *, Low (unlikely to have) - *
| Priority | As a … | I want to … | So that I can… |
|---|---|---|---|
|
new user |
see usage instructions |
refer to instructions when I forget how to use the App |
|
picky eater |
filter food preferences |
cook food that matches my taste |
|
frugal user |
easily search for recipes with the ingredients I already have |
use up all the food in my fridge |
|
frequent user |
save my favourite recipes |
quickly navigate to them without having to search them up again |
|
goal-oriented student |
track my progress |
see how far I came and how much further I have to go to reach my goal |
|
user with many recipes in the recipe book |
filter recipes by various criteria |
locate a recipe easily |
|
user with allergies |
exclude ingredients that I am allergic to |
obtain recipes that are catered to me |
|
user struggling to eat healthier |
receive motivation for eating healthy meals |
stay motivated on my goal |
|
user who cooks regularly |
add my own recipes with the goals they fall under |
progress in my goals when I cook my own unique meals |
|
unmotivated user |
choose a goal for myself |
cook more meals and be motivated by my progress |
|
unmotivated user |
track my streak of healthy meals |
motivated to keep eating healthy |
|
user who loses motivation easily |
look at daily quotes to remind myself |
remember why I wanted to continue to be healthy |
|
user who dislikes food wastage |
see what ingredients I need to buy when I grocery shop |
only buy ingredients that I will use |
|
busy student |
get a list of the ingredients I need for the week in one go |
save time and not make wasted trips |
|
busy student |
pre-select meals for certain days |
save time from ruminating over what to cook |
|
bodybuilder |
search for protein-rich recipes specifically |
build my muscles |
|
busy student |
filter recipes by preparation time |
choose meals that can be done quickly |
|
avid planner |
choose recipes and place them in a timetable for the week |
plan my meals beforehand |
|
novice cook |
filter recipes by difficulty level |
select easier recipes |
|
user who is passionate about cooking |
share the recipes on social media |
show my friends what I have cooked today |
|
adventurous user |
filter the recipes by cuisine |
try a new cuisine every time |
|
user who prefers hard-copy materials |
save my favourite recipes locally |
print them out |
|
frequent party host |
scale up the amount of ingredients needed |
make the correct amount of food |
|
student on budget |
choose recipes that require lower cost |
save money |
|
adventurous user |
ask for suggested recipes |
choose a random recipe and start cooking |
|
adventurous user |
mix up recipes |
try something completely new |
|
motivational user |
add custom quotes to app online |
motivate other users with different quotes |
Appendix C: Use Cases
(For all use cases below, the System is HealthyBaby and the Actor is the user, unless specified otherwise)
Use case: Add recipe
MSS
-
User requests to add recipe
-
HealthyBaby creates a new recipe with the specified name
Use case ends.
Extensions
-
2a. The name/time/ingredients fields are empty.
-
2a1. HealthyBaby shows an error message.
Use case resumes at step 1.
-
-
2b. The given name already exists.
-
2b1. HealthyBaby shows an error message.
Use case resumes at step 1.
-
-
2c. The user tries to add goals that do not exist in the goals list.
-
2c1. HealthyBaby shows an error message.
Use case resumes at step 1.
-
Use case: Delete recipe
MSS
-
User requests to list recipes
-
HealthyBaby shows a list of recipes
-
User requests to delete a specific recipe in the list
-
HealthyBaby deletes the recipe
Use case ends.
Extensions
-
2a. The list is empty.
Use case ends.
-
3a. The given index is invalid.
-
3a1. RecipeBook shows an error message.
Use case resumes at step 2.
-
Use case: Find recipe
MSS
-
User enters desired recipe name into CLI
-
HealthyBaby shows the desired recipe
Use case ends.
Extensions
-
2a. The desired recipe name does not exist in the list.
-
2a1. HealthyBaby tells the user that 0 recipes are listed.
Use case ends.
-
Use case: Plan for a recipe
MSS
-
User enters the recipe index and date that they would like to plan for
-
HealthyBaby adds the new plan to the list of plans
-
HealthyBaby displays the success message, switches to the planning tab and displays the updated list of plans.
Use case ends.
Extensions
-
2a. The given recipe index is invalid.
-
2a1. HealthyBaby shows an error message.
Use case ends.
-
-
2b. The given date is invalid.
-
2b1. HealthyBaby shows an error message.
Use case ends.
-
-
2c. A similar plan with the same recipe and date already exists in the list.
-
2c1. HealthyBaby shows an error message.
Use case ends.
-
Use case: Clear entire recipe list
MSS
-
User enters the clear command
-
HealthyBaby clears the entire recipe and plans list
Use case ends.
Appendix D: Non Functional Requirements
-
Should work on any mainstream OS as long as it has Java
11or above installed. -
Should be able to hold up to 1000 recipes without a noticeable sluggishness in performance for typical usage.
-
A user with above average typing speed for regular English text (i.e. not code, not system admin commands) should be able to accomplish most of the tasks faster using commands than using the mouse.
-
The software should be portable (i.e. works on and can be moved to different operating systems)
{More to be added}
Appendix F: Instructions for Manual Testing
Given below are instructions to test the app manually.
| These instructions only provide a starting point for testers to work on; testers are expected to do more exploratory testing. |
F.1. Launch and Shutdown
-
Initial launch
-
Download the jar file and copy into an empty folder
-
Double-click the jar file
Expected: Shows the GUI with a set of sample contacts. The window size may not be optimum.
-
-
Saving window preferences
-
Resize the window to an optimum size. Move the window to a different location. Close the window.
-
Re-launch the app by double-clicking the jar file.
Expected: The most recent window size and location is retained.
-
F.2. Deleting a recipe
-
Deleting a recipe while all recipes are listed and no plans exist
-
Prerequisites: List all recipes using the
listcommand.
Multiple recipes in the list must be present. If required, add recipes by using theaddcommand.
Plan list is empty. If required, clear plans by using theclearPlancommand. -
Test case:
delete 1
Expected: First recipe is deleted from the list. Name of the deleted recipe shown in the result box. -
Test case:
delete 0
Expected: No recipe is deleted. Error details shown in the result box. -
Other incorrect delete commands to try:
delete,delete x(where x is larger than the list size)
Expected: Similar to previous.
-
-
Deleting a recipe while all recipes are listed and plans exist
-
Prerequisites: List all recipes using the
listcommand.
Multiple recipes in the list must be present. If required, add recipes by using theaddcommand.
Plan list contains a plan for the recipe at recipe index 1. If required, add a plan using theplancommand. -
Test case:
delete 1
Expected: First recipe is deleted from the list. Name of the deleted recipe shown in the result box. The plan for recipe 1 is removed from the list of plans in the 'Planning' tab.
-
F.3. Favourite a recipe
-
Favouriting a recipe while all recipes are listed
-
Prerequisites: List all recipes using the
listcommand. There must be at least 2 recipes for all the following test cases to work as expected. -
Test case:
favourite 1
Expected: A star appears beside the recipe name, indicating that it has been marked as a favourite and a success message appears in the message box. -
Test case:
favourite 0
Expected: No recipe is favourited. An error message appears in the message box. -
Test case:
favourite 1 2
Expected: A star appears beside the names of recipe 1 and 2, indicating that they have been marked as favourites and a success message appears in the message box.
-
F.4. Unfavourite a recipe
-
Unfavouriting a recipe while all recipes are listed
-
Prerequisites: List all recipes using the
listcommand. Recipe 1 must be favourited as well. -
Test case:
unfavourite 1
Expected: The star beside recipe 1 disappears, indicating that it has been removed from favourites and a success message appears in the message box. -
Test case:
unfavourite 0
Expected: No recipe is unfavourited. An error message appears in the message box.
-
F.5. Filtering recipes
-
Filters recipes that match the given criteria
-
Prerequisites: List all recipes using the
listcommand. At least one recipe should be favourited and at least one recipe should contain a grain ingredient called "Bread" -
Test case:
filter favourites
Expected: Only recipes that are favourites (has a star beside its name) are displayed. -
Test case:
filter ig/Bread
Expected: Only recipes that have a grain ingredient called "Bread" are displayed.
-
F.6. Undo and Redo
-
Undoes the previous action, followed by restoring the action that was undone
-
Prerequisites: List all recipes using the
listcommand. Recipe 1 should not be favourited and should not contain a grain ingredient called "Bread" -
Test case:
favourite 1, followed byundo, followed byredoExpected: A star appears beside recipe 1’s name upon favouriting it, disappears upon undoing, and reappears upon redoing. -
Test case:
addingredient 1 ig/2g, Bread, followed byundo, followed byredoExpected: A bread ingredient appears under the "Grains" section of recipe 1 upon addingredient, disappears upon undoing, and reappears upon redoing.
-
F.7. Clearing the recipe list
-
Clearing the list while plans are present.
-
Prerequisites: Plan a recipe using the
plancommand. -
Test case:
clear
Expected: All recipes and plans are cleared from the list.
-
-
Clearing the list while plans are not present.
-
Prerequisites: No plans are present. Clear the plans by using the
clearPlancommand. -
Test case:
clear
Expected: All recipes are cleared from the list.
-
F.8. Adding plans
-
Adding a plan to an empty plan list.
-
Prerequisites: No plans are present. If required, clear the plans by using the
clearPlancommand.
At least one recipe exist in the recipe list. If required, add recipes by using theaddcommand. -
Test case:
plan 1 d/2020-05-20
Expected: Recipe at index 1 is planned on 20 May 2020. -
Test case:
plan -1 d/2020-05-20
Expected: Plan is not added. Error details shown in the result box. Other incorrect plan commands to try:plan,plan 0,plan x(where x is larger than the list size)
Expected: Similar to previous. -
Test case:
plan 1 d/2019-05-20
Expected: Plan is not added. Error details shown in the result box.
-
-
Adding multiple plans to an empty plan list.
-
Prerequisites: No plans are present. If required, clear the plans by using the
clearPlancommand.
Multiple recipes exist in the recipe list. If required, add recipes by using theaddcommand. -
Test case:
plan 1 2 3 d/2020-05-20
Expected: Recipes at indexes 1, 2 and 3 are planned on 20 May 2020. -
Test case:
plan 1 -2 3 d/2020-05-20
Expected: No plans are added. Error details shown in the result box. -
Test case:
plan 1 2 3 d/2019-05-20
Expected: Plan is not added. Error details shown in the result box.
-
-
Adding plan(s) to a plan list that is not empty.
-
Prerequisites: A plan for the recipe at recipe index 1 exists. If required, plan for the recipe by using the
plancommand. -
Test case:
plan 1 d/2020-05-20
Expected: No plans are added. Duplicate message is shown in the result box. -
Test case:
plan 1 -2 3 d/2020-05-20
-
F.9. Deleting plans
-
Deleting a plan while plans exist.
-
Prerequisites: Plans are present. If required, add plans by using the
plancommand. -
Test case:
deletePlan 1
Expected: Plan at plan index 1 is deleted. -
Test case:
deletePlan -1
Expected: Plan is not deleted. Error details shown in the result box. Other incorrect plan commands to try:deletePlan,deletePlan 0,deletePlan x(where x is larger than the list size)
Expected: Similar to previous.
-
-
Deleting a plan while multiple plans exist.
-
Prerequisites: More than one plan are present. If required, add plans by using the
plancommand. -
Test case:
deletePlan 1 2
Expected: Plan at plan indexes 1 and 2 are deleted. -
Test case:
deletePlan 1 -2
Expected: Plan is not deleted. Error details shown in the result box. Other incorrect plan commands to try:deletePlan 1 0,deletePlan 2 x, (where x is larger than the list size)
Expected: Similar to previous.
-
F.10. Clearing plans
-
Clearing plans while plans exist.
-
Prerequisites: Plans are present. If required, add plans by using the
plancommand. -
Test case:
clearPlan
Expected: All plans in the plan list are cleared.
-
F.11. Obtaining grocery list
-
Obtain grocery list while plans exist.
-
Prerequisites: Plans are present. If required, add plans by using the
plancommand. -
Test case:
groceryList
Expected: A window appears, listing all the ingredients used for the recipes in the plans.
-
-
Obtain grocery list while no plans exist.
-
Prerequisites: Plan list is empty. If required, clear plans by using the
clearPlancommand. -
Test case:
groceryList
Expected: No window appears. Error details shown in the result box.
-
-
Update and show grocery list while grocery list window is minimised.
-
Prerequisites: Plans are present. If required, add plans by using the
plancommand. Grocery list window is opened then minimised. If required, open the window first by using thegroceryListcommand, then minimise that window. -
Test case:
groceryList
Expected: Window with updated grocery list appears.
-
F.12. Cooking recipes
-
Mark a recipe as cooked
-
Prerequisites: Recipes are present. If required, add recipes by using the
addcommand. -
Test case:
cooked 1
Expected: The result box below informs the user that the recipe has been cooked.
-
-
Cooking a recipe that has already been cooked.
-
Prerequisites: Records list contains records cooked within the day.
-
Test case:
cooked 1
Expected: The result box below informs the user that the recipe is a duplicated and cannot be added in.
-
-
Cooking multiple recipes
-
Prerequisites: Recipes are present. If required, add recipes by using the
addcommand. -
Test case:
cooked 1 2 3
Expected: The result box below informs the user that the recipes have been cooked.
-
F.13. Adding quotes
-
Quote displays while quotelist is not empty.
-
Prerequisites: Quotes are present. If required, add quotes by using the
quotecommand. -
Test case:
quote Today is a good day
Expected: The result box below informs the user that the quote has been added.
-
-
Adding a quote while it already exists in the list
-
Prerequisites: Quotes list contains quote. If required, add the same quote by using the
quotecommand. -
Test case:
quote Skip the diet, just eat healthy!
Expected: The result box below informs the user that the quote is a duplicated and cannot be added in.
-
{ more test cases … }
F.14. Saving data
-
Dealing with missing data files.
-
Close the jar file.
-
Delete one or more files from the data folder.
-
Double-click the jar file.
Expected: Deleting the files would result in these corresponding results:-
Recipebook: Default recipes in 'Recipes'
-
Quotebook: Default quotes in 'Achievements'
-
Plannedbook: An empty plan list in 'Planning'
-
Cookedrecords: An empty cooked meals list with no pie chart in 'Goals'
-
-
-
Dealing with corrupted data files.
-
Close the jar file.
-
Type '~!@' in any of the files in the data folder and save the file.
-
Double-click the jar file.
Expected: Adding corrupted data into the files would result in these corresponding results:-
Recipebook: An empty recipe list in 'Recipes' as well as an empty plan list in 'Planning'
-
Quotebook: An empty quote list in 'Quotes' and default quote in 'Achievements'
-
Plannedbook: An empty plan list in 'Planning'
-
Cookedrecords: An empty cooked meals list with no pie chard in 'Goals'
-
-
{ more test cases … }